
I’ve never really had any particular complaints with Figma, it’s probably the best design tool on the market. I have it open most days and most of my coursework and personal projects are in it. But I always look for an open source equivalent for whatever tool I’m using. There is a penwhich is practically a mirror of Figma, is my top recommended alternative to open source Figma. However, it still has a paywall. me recently I found OpenPencilwhich is an amazing open source Figma alternative with a great AI-powered workflow. But the search didn’t end there…
Quant-UX appeared on my radar shortly after, even though it has been around for years. It’s a completely free and open source design tool, and it has a couple of built-in features that Figma doesn’t have.
What exactly is Quant-UX?
It has something that Figma doesn’t have.

Quant-UX is a free, open source tool that manages prototyping, user testing, and analysis in the same place. It runs in the browser so you can sign up and start working without installing anything. There’s also the option to host it yourself if you prefer to run it on your own server, but the hosted version is likely the one most people will use, and it’s the same tool either way. It’s been around longer than I thought – development began in 2017.
The central idea is to create interactive prototypes, share them through a link and obtain real usage data from whoever tests them. So instead of just designing screens, you’re designing something that can be tested. There’s an Examples section with working templates (purchasing flows, login screens, dashboards, that sort of thing) that’s really helpful if you’re the type who freezes at a blank canvas (that’s me). And it has the usual design system features like tokens, master screens, and reusable components, plus an AI assistant built in with BYOK. If you have existing work in Figma, you can also import it, so you won’t be starting from scratch (but note that it flattens all layers, so it will be for reference only, not for further editing).
The interesting thing about Quant-UX is that it relies more on the UX research side of things. Normally, you would combine a tool like Maze with Figma for user testing, but Quant-UX already has it built in.

The design canvas is a bit disappointing.
But it is more than viable

I won’t lie, when I first tried the designer canvas I was a little disappointed. The feature set is about half of what I’m used to seeing in a UI/UX design tool. You get the essentials: shapes, text, images, basic alignment, position and size controls, constraints, borders, simple effects like shadow and blur, and a layers panel, but many of the deeper controls you’d reach in something like Figma or Penpot simply aren’t there. The typography controls are quite fine, the list of premade elements is quite short, and it lacks advanced vector editing.
That being said, once I started building, I realized that I wasn’t looking for the missing things as much as I expected. The canvas covers enough ground for me to mount actual displays and what it lacks in design depth it makes up for pretty much everywhere else…
Prototyping and Testing Really Go Hand in Hand
This is where Figma falls short
Quant-UX’s biggest selling point is prototyping. In Figma, prototypes are basically clicks on static frames. A dropdown menu is a hotspot that jumps to another frame where you opened it and the entries are not writable. In Quant-UX, widgets are real: inputs accept text, dropdowns actually open, modals overlay correctly, and state can persist across screens. For example, a cart counter that goes from 0 to 1 after clicking Buy is an action in Quant-UX. In Figma it would be a separate frame for each cart state.
You can also run form validation and conditional logic, so when a tester walks through the prototype, what they’re using behaves much closer to a real product than a slideshow of screens. Figma doesn’t actually have native user testing implemented in this way, not even at the paid tier. You can connect third-party tools like Maze, and there is also a UserTesting Figma plugin, but they are all paid platforms overlaying it.
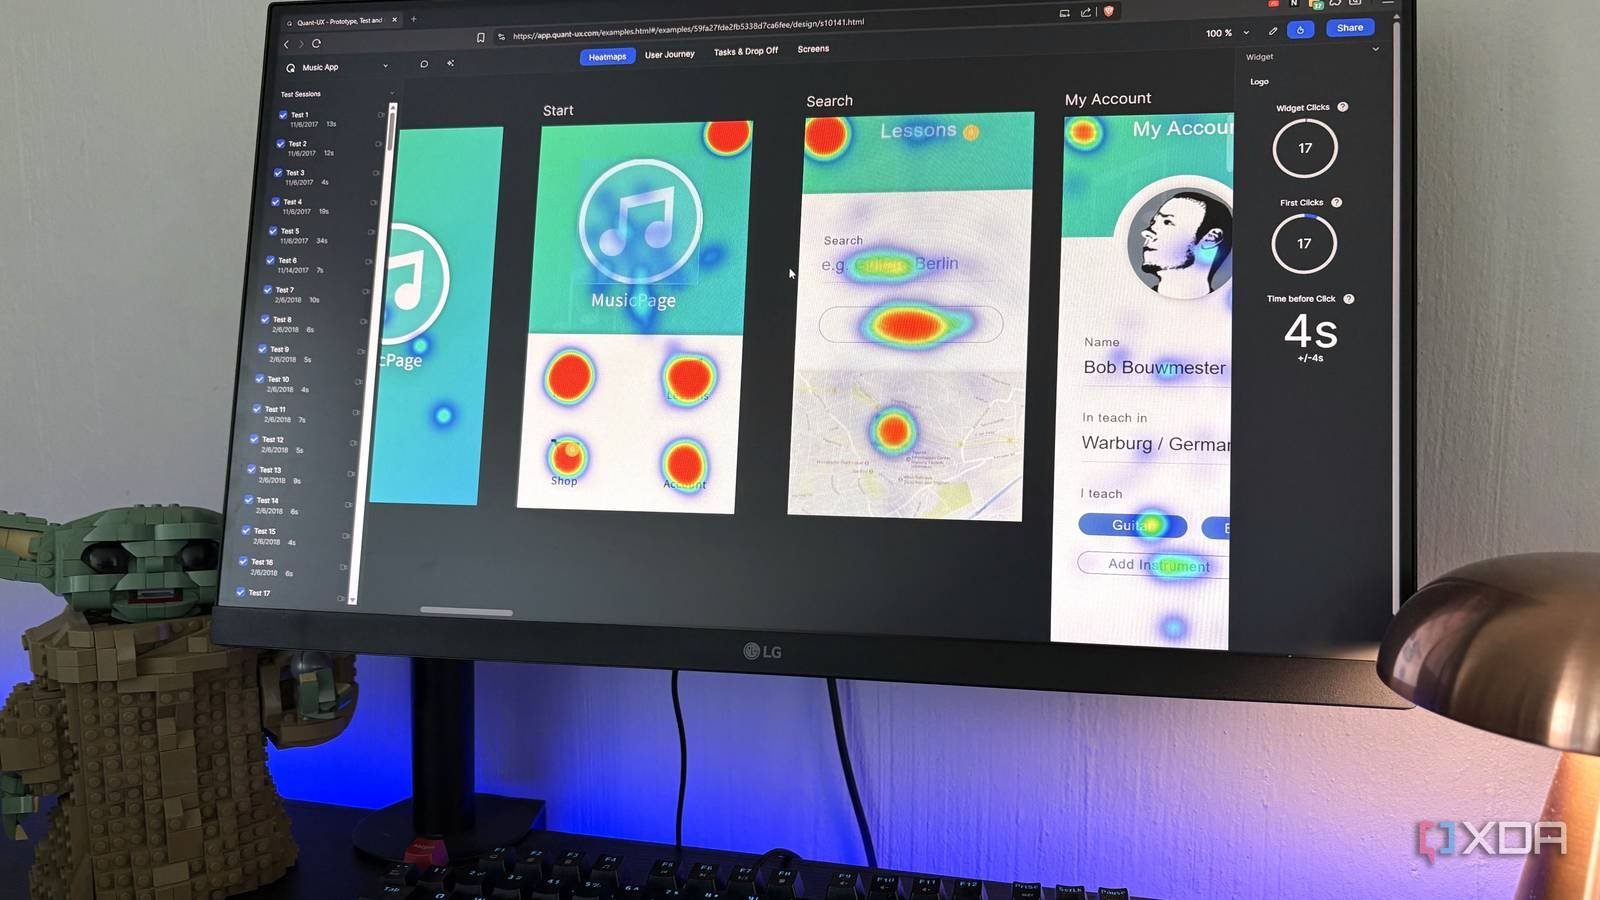
Quant-UX integrates the entire cycle. You define your tasks in advance, share the prototype link with testers, and Quant-UX records each session: clicks, screen time, where they got stuck, etc. There are also built-in A/B tests if you want to compare two versions side by side.
The data side is where heatmaps come in. Quant-UX automatically pulls everything from those test sessions into an analytics canvas, and you can view this data through clickable heatmaps that show where people tapped. There are also heatmaps that show which screens were viewed, dwell time per screen, success rates per task, and the combined user journey so you can see common paths versus atypical ones. You can also access individual screen recordings to view sessions.
So you’re not just replacing Figma here, you’re replacing Figma plus Maze with a tool, and the analytics appear attached to the actual prototype instead of in a separate panel that you have to switch to. There is no built-in tester recruitment, so you will bring your own people to the test.
Closer to a real product than Figma brings you
I think the design canvas could use a little more love, but everything else Quant-UX gives you is really impressive, especially the combination of prototyping and testing that you’d normally have to pay for in two separate tools. As a design student, it’s hard to overstate that all of this research as part of the design process is free.